Thursday, March 18, 2010

IBF Bracket

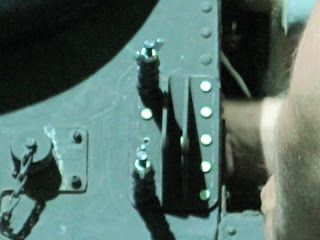
This is an IBF bracket. It is a bracket for a modification for a big filter on the intake of the engines on the helicopters to catch the sand. Now, this modification was not installed by the Army. It was installed by civilians paid much more than soldiers to do the same job. However, they did not do the job right. This particular bracket was put in 1/8 of an inch too low. Now, that may not seem like a lot to you all, but in terms of an aircraft, that may as well be a mile. So, we started out by drilling out the Hilocks that held it in place. A Hilock is a fancy bolt that has a collar instead of a nut. Once the collar is installed, you cannot get it off unless you destroy it.


With many hours of measuring, drilling, sweating and swearing, we got the new bracket drilled to the proper location and started to install 11 new Hilocks. As you can see from this picture, the space is rather limited. Behind that panel that you see, is a bunch of wires, bolts, nuts, and other various parts that rub against the skin and take up a lot of room.

In this picture, you can see that there is really no way to go at this in a comfortable position. Phillips, (The other guy in my shop) and I had to switch out after every couple Hilocks. The reason for this is because the collars on the Hilock has a hex head on one end and is flat on the other end. The flat end threads on the Hilock, and you use a wrench on the hex end to finish installing the collar. Once the collar gets to a certian tourque, the hex head snaps off, leaving the collar on the Hilock. Well, the issue with this is, the Hilocks have a tendency to spin. So, in the end of the Hilock, opposite of the head, is a hex key hole. You have to put an allen wrench inside the hole, hold the hex key, and turn the wrench all at the same time, and all on the same end. As you can see, I am only using one hand. That is because there is barely room for one hand on the inside of this project. So, one hand got to do the job of two hands. Let's just say, it took a while.


This was started on Tuesday, at 16:00, (4:00pm). We stopped for the night at 20:00 (8:00pm). Wednesday, my day off, I was at work by 05:45am. Phillips and I did not leave untill 01:45 Thursday morning. In other words, Phillips pulled an 18 hour shift, and I pulled a 20 hour shift. Today is my day off for the week, and I am VERY tired.


Wednesday, March 10, 2010

Another Day Down

Not a whole lot going on this week. One of my room mates moved into another room, so I now have half of a three man room to myself. I will take some pictures of my new layout for next week. One thing that has been a bit frustrating is the fact that I pay almost 90 dollars a month for internet, and we have not had two consecutive days of internet in over a month. The system is designed for computers only. If anyone plugs in a router, or game system, the internet for our whole row of buildings goes out. There is someone in our row who, every night around 10:00 or so, plugs in something they are not suppose to, and knocks out all of our internet. What really sucks is that I have paid for the internet, but don't get to use it. Kind of crappy but oh well. A few more weeks, and I get to come home on leave. I cannot wait. Other than that, there is nothing going on here. I am glad that is is a slow news week. It means that we are safe, even if we are bored.

Tuesday, March 2, 2010

This week.

As you all can see, I was allowed to put my TV and sound system back up this week. It is great to have it back. Mostly because of the sound system. I like to have music playing while I am working.

This picture is of a cabin door on a Black Hawk. You may abe asking what the Duct Tape is for. Well, these doors are made of Kevlar and Fiber Glass. The pilots had, throught very rough use, put a hole throught the door. Due to time restrictions, I was not allowed to bring the door into my shop, so I had to repair it on the aircraft. Well, as you all know, a composite repair needs to have constant, even pressure on it while it cures for the repair to work. Since I had no way of clamping the pressure plates to the door, I had to use a bag of rivets as a raised point, and wrap tape aound the door to apply pressure to the bag. The pressure was then distribuited by the pressure plates. In the end, the door turned out great.


The above three pictures are of a particularly cool repair. For OPSEC reasons, all I can say it there was a hole put in the aircraft. The bottom picture is what the hole looked like after I chain drilled it. As you can see, I drew a box around the damage. This box will be the size of the hole when I am done. You want to remove all the damage, and get yourself a symetrical shape to work with. This way, making the filler and patch (Top Picture), will be a lot easier. The middle picture is the hole after I cleaned all the damage out. The top picture is the filler, or the piece that is doing to go inside the hole, and the patch that will cover the whole repair. As you can see in the bottom picture, the damage occured close to an already existing rivet pattern. The tricky part is working that rivet pattern into my repair. This one was simple for the type of repair it was, but still a good challange. Both repairs were done by me in less than 24 hours. I am given a VERY short amount of time becuause the aircraft cannot be down for long. I have spent many late nights (Sometimes as late as midnight) and early mornings (2 hours earlier than normal) at the shop to get it all done.